
Quick Links
- Upgrade Elasticsearch 7.17 to Elasticsearch 8.x
- The correct order for upgrading nodes
- How to upgrade nodes in a rolling upgrade
- Kibana deprecation issue
Upgrade Elasticsearch 7.17 to Elasticsearch 8.x
In this article, we will focus on upgrading Elasticsearch 7.17 to Elasticsearch 8.x. For more information on version upgrades in general, the different methods available, and everything you need to know prior to initiating the upgrade, you can see our complete guide here: How to Upgrade Elasticsearch Versions.
Rolling upgrades are only supported from Elasticsearch version 7.17 to Elasticsearch version 8.x. To upgrade from earlier versions (7.1, 7.2, etc.) to version 8, you need a full cluster restart or you must upgrade first to version 7.17 before upgrading to version 8.
Preparing to upgrade Elasticsearch nodes
Elasticsearch nodes cannot be downgraded after upgrading. Before starting the upgrade process you should do the following:
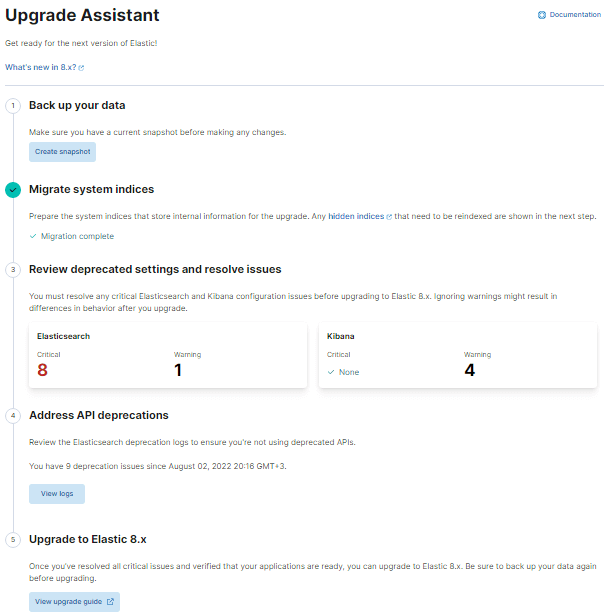
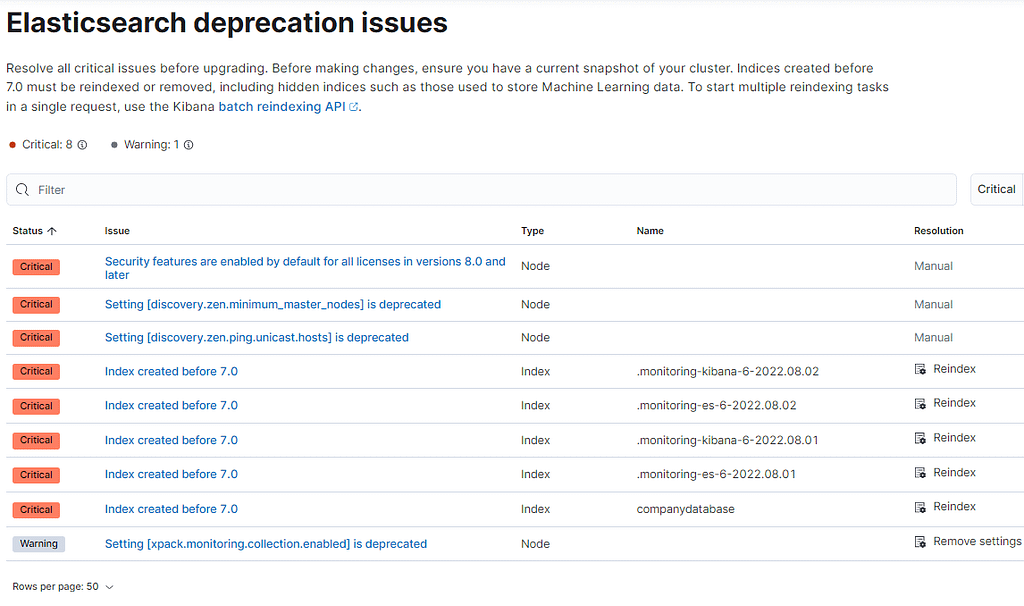
1. Use the Kibana Upgrade Assistant
The Kibana Upgrade Assistant is very helpful because it can indicate:
- Indices that are not compatible with version 8 and must be reindexed.
- Settings in elasticsearch.yml and/or kibana.yml that are deprecated and must be updated/replaced.
- Cluster settings that are not compatible with version 8.
2. Check the deprecation log
You should read and resolve any issues highlighted in the deprecation log. These logs are usually located in:
/var/log/elasticsearch/Your-Cluster-Name_deprecation.log
3. Review the breaking changes
Breaking changes documentation is published with each new version of Elasticsearch to make you aware of any functionality that may change or disappear. You should always check that documentation to ensure that none of those settings, configurations, or mappings are being used in your setup. The main things that could be affected are:
- Node configuration (elasticsearch.yml)
- Index mappings and templates
- Cluster settings
- Code used in Elasticsearch clients (applications and indexing scripts)
The most important breaking changes in version 8 are:
- Doc_types are deprecated, and all references to them must be removed
- Security is enabled by default
- Kibana can no longer use “elastic” user, it must have its own “kibana_system” user
- Python client syntax changes, e.g., instead of “body”, you need to pass in separate arguments for “query”, ”aggs”, ”sort”, etc.
4. Check the Elasticsearch plugins’ compatibility
If you are using any Elasticsearch plugins, you should check the availability and compatibility of those plugins with the new version.
In particular, bear in mind that most of the snapshot repository plugins are now part of the standard distribution, with no plugin required.
5. Set up a test environment
You should first try the upgrade process in a test or staging environment in order to check and resolve all issues before upgrading your production cluster.
6. Backup your data
Remember that it is not possible to downgrade an Elasticsearch node, so the only way to practically reverse a failed upgrade is to create a new cluster with the old version and recover your data from snapshots. Therefore, it is essential to take snapshots of all Elasticsearch indices before starting the upgrade process.
7. Check your security configuration
Security is enabled by default in version 8, so if you do NOT have security enabled in version 7, it is recommended to either set up security in version 7 before upgrading or set:
xpack.security.enabled: false
It is not recommended to try to add security and upgrade in the same process because adding tls certificates will result in some downtime.
Note that Kibana often requires some extra security configuration, which should be performed BEFORE upgrading. You can read more about this below.
After taking all the steps listed above, we are ready to upgrade Elasticsearch Cluster version 7.17.5 to Elasticsearch version 8.3.3.
The correct order for upgrading nodes
- Begin by upgrading nodes that are not master-eligible. To find these nodes, use either the GET /_nodes/_all,master:false/_none API call or locate nodes configured with node.master: false.
- Proceed with the upgrade tier-by-tier, starting with the frozen tier. Complete the upgrade for all nodes in each data tier before moving to the next one. Upgrade the frozen tier first, followed by the cold, warm, and finally the hot tier. This ensures that the data can still flow through the tiers during the upgrade. To obtain a list of nodes in a specific tier, use the GET /_nodes request. For example, GET /_nodes/data_frozen:true/_none.
- Finally, upgrade the master-eligible nodes. Retrieve a list of these nodes using GET /_nodes/master:true.
Following this order guarantees that all nodes can join the cluster during the upgrade process. Upgraded nodes can join a cluster with an older master, but older nodes may not be able to join a cluster with an upgraded master.
Upgrading nodes in a rolling upgrade
How to upgrade Elasticsearch nodes in a rolling upgrade:
- Make sure your cluster is stable, green
You need to make sure that all replicas are available in order to ensure that shutting down the node will not result in a loss of data.
- Disable unnecessary indexing
Wherever it is practically feasible to do so, you should stop all indexing processes because that will increase cluster stability.
- Disable shard allocation
It is important to stop shards reallocating so that when you stop a node for an upgrade the cluster does not reallocate shards to another node (see the command below).
- Stop Elasticsearch
- Remove old plugins, especially any repository plugins
Failing to remove any repository plugins before upgrading can be complicated to fix.
- Upgrade Elasticsearch
The method used to upgrade will depend upon the installation method used to install.
- Upgrade plugins
Elasticsearch will not start if the plugin is not exactly the same version as Elasticsearch.
- Start Elasticsearch
- Re-enable shard allocation
Using the command given below.
- Check that the upgraded node has rejoined the cluster
Using the command below, you can check how many nodes are in the cluster.
- Wait for cluster status to turn green
The command provided below will also show you the progress of the shard recovery process on the upgraded node until the cluster reaches a green state.
Do not be in a hurry to upgrade your nodes, wait for the cluster to fully recover before moving on. If the cluster does not go green, look in the logs to find any issues that may indicate problems with the upgrade or configuration. - Repeat
Repeat the full process above for each node.
To stop a node, run:
systemctl stop elasticsearch
To disable shard allocation, run:
PUT _cluster/settings
{
  "persistent": {
    "cluster.routing.allocation.enable": "primaries"
  }
}
To remove plugins, e.g., s3:
sudo bin/elasticsearch-plugin remove repository-s3
To reload the daemon after upgrading:
systemctl   daemon-reload
systemctl  enable elasticsearch
To re-enable shard allocation, run:
PUT _cluster/settings
{
  "persistent": {
    "cluster.routing.allocation.enable": null
  }
}
To get cluster status and see how many nodes are in the cluster, use:
GET _cluster/health
Kibana deprecation issue
When upgrading an Elasticsearch cluster, it is common to encounter the following error:
“Using ‘elasticsearch.username’ elastic is deprecated”
To solve that issue, run the following command BEFORE upgrading the Elasticsearch cluster:
POST /_security/service/elastic/kibana/credential/token
Doing so will create the following result:
{
  "created" : true,
  "token" : {
    "name" : "token_NHoHZYIB67fR10103kQc",
    "value" : "AAEAAWVsYXN0aWMva2liYW5hL3Rva2VuX05Ib0haWUlCNjdmUjEwMTAza1FjOkFtMnlQcjB1UmNDZWU3WUIxSVJDa1E"
  }
}
Then, you copy the value and add the configuration below to kibana.yml:
elasticsearch.serviceAccountToken:AAEAAWVsYXN0aWMva2liYW5hL3Rva2VuX05Ib0haWUlCNjdmUjEwMTAza1FjOkFtMnlQcjB1UmNDZWU3WUIxSVJDa1E"
And then remove these configurations lines from kibana.yml:
elasticsearch.username: "elastic"
elasticsearch.password: "password"
After that, you should restart Kibana and ensure that it can still connect and that the issue has been removed from the Kibana Upgrade Assistant.