
Overview
This article is Part I of a 3-part series on how to secure an OpenSearch cluster.
- Part I – Access Control (users, roles, permissions, etc)
- Part II – Configuration (certificates)
- Part III – Audit logs (how to create a Dashboard to visualize audit logs)
Quick links
- Access control – introduction
- Important concepts to understand access control in OpenSearch:
- Use case example – why we need to secure our data and how to do it
- Roles/Permissions model
- All users and roles – configuration options
- Summary
Access Control
Sometimes we need different users to access different documents or fields within the same index, and access control becomes a concern. You could create different indices for each of the user roles, but that can be hard to maintain and data redundant. You could also put the cluster behind a backend, and let the backend create the queries/filter documents/hide fields, but this solution is prone to errors and data leaking.
By setting up access control in the cluster, you can ensure that each user will be able to access what they need to in order to complete their tasks, without being exposed to data they shouldn’t be.
In this article we will explore the OpenSearch security plugin and its available tools, going way beyond setting a user and password. We will take a look at the main concepts, and then wrap everything up in an example use case.
Important concepts
To understand how Access Control works in OpenSearch, we need to understand a set of core concepts. Some of them are similar to Elasticsearch ones, while others are slightly different or entirely new.
| Term | Description |
|---|---|
| Permission | An individual action, such as creating an index (e.g. indices:admin/create). For a complete list, see Permissions. |
| Action group | A set of permissions. For example, the predefined SEARCH action group authorizes roles to use the _search and _msearch APIs. |
| Role | Security roles define the scope of a permission or action group: cluster, index, document, or field. For example, a role named delivery_analyst might have no cluster permissions, the READ action group for all indices that match the delivery-data-* pattern, access to all document types within those indices, and access to all fields except delivery_driver_name. |
| Backend role | (Optional) Arbitrary strings that you specify or that come from an external authentication system (e.g. LDAP/Active Directory). Backend roles can help simplify the role mapping process. Rather than mapping a role to 100 individual users, you can map the role to a single backend role that all 100 users share. |
| User | Users make requests to OpenSearch clusters. A user has credentials (e.g. a username and password), zero or more backend roles, and zero or more custom attributes. |
| Role mapping | Users assume roles after they successfully authenticate. Role mappings map roles to users (or backend roles). For example, a mapping of kibana_user (role) to jdoe (user) means that John Doe gains all the permissions of kibana_user after authenticating. Likewise, a mapping of all_access (role) to admin (backend role) means that any user with the backend role of admin gains all the permissions of all_access after authenticating. You can map each role to many users and/or backend roles. |
| Tenant | Virtual scope for Dashboard and other saved objects. |
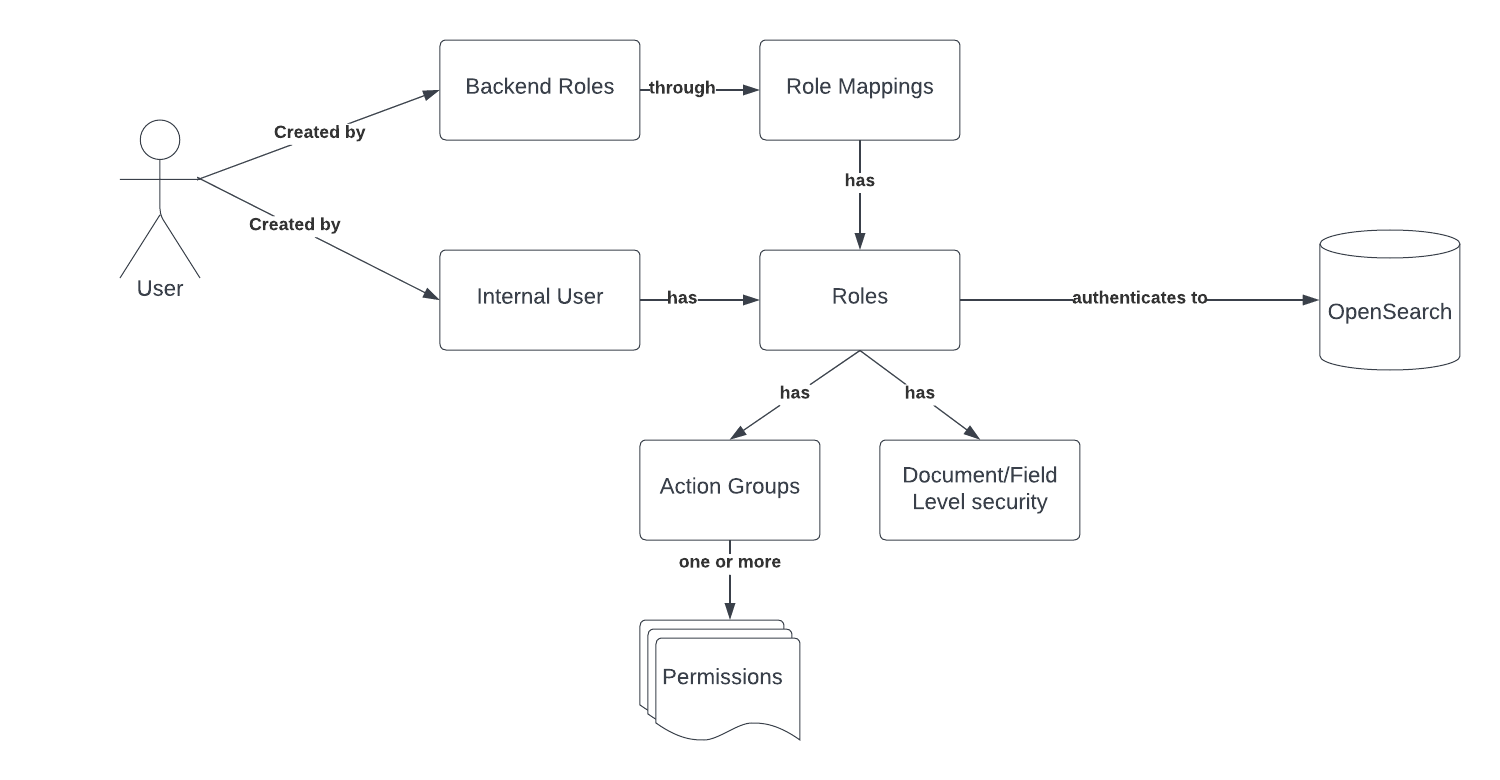
In short, we can create internal users in OpenSearch, or use an external authentication service (backend) and map these users to OpenSearch roles.
Here’s a simple diagram to show core concepts in a more visual way:
Use case example – why we need to secure our data and how to do it
To demonstrate the need for access control and how to approach the needed configuration, let’s create an imaginary company called Happylily. Happylily aims to improve users’ moods and outlooks using an app.
Each customer can log in, participate in exercises and see their mood measurements. These exercises are overseen by “wellness” managers and account managers. Based on the collected, the wellness manager will provide relevant media content to help improve the customer’s mood. The account manager has full access to a certain subset of user data to oversee operations.
The use case requirement is to protect customers data, and keep only the documents and fields that need to be seen for each actor.
*Disclaimer: This is not a production model setup, just an example to illustrate the security features. Also, DLS (Document Level Security) and FLS (Field Level Security) are read-only, this example assumes all accounts are read-only.
An employee can access one or many user documents, and some fields depending on the role. A customer can see their own documents, and only see certain fields.
The model should achieve the following:
- Customer: Can read their documents, and only see the customer_* and media fields.
- Account Manager: Can read all fields, but only for some customers.
- Wellness Manager: Have access to customer_* and media fields of certain users.
For simplicity, each customer will hold one document which we will index in our OpenSearch instance to get started.
POST customer_index / _doc {
    "customer_id": "gpete",
    "customer_name": "Grumpy Pete",
    "customer_mood": "Angry",
    "media": [{
        "category": "joke",
        "content": " I almost forgot what a boomerang was, I’m glad it came back to me!"
    }],
    "internal_customer_profit": 10000,
    "internal_risky_client": false
}
POST customer_index / _doc {
"customer_id": "hjane",
"customer_name": "Happy Jane",
"customer_mood": "Happy",
"media": [{
"category": "news",
"content": "Before There Were Birds or Bees, This Is How Trilobites Made Babies..."
}],
"internal_customer_profit": 10000,
"internal_risky_client": false
}POST customer_index / _doc {
"customer_id": "nnicole",
"customer_name": "Neutral Nicole",
"customer_mood": "Neutral",
"media": [{
"category": "quote",
"content": "Each morning, we are born again. What we do today is what matters most."
}],
"internal_customer_profit": 0,
"internal_risky_client": false
}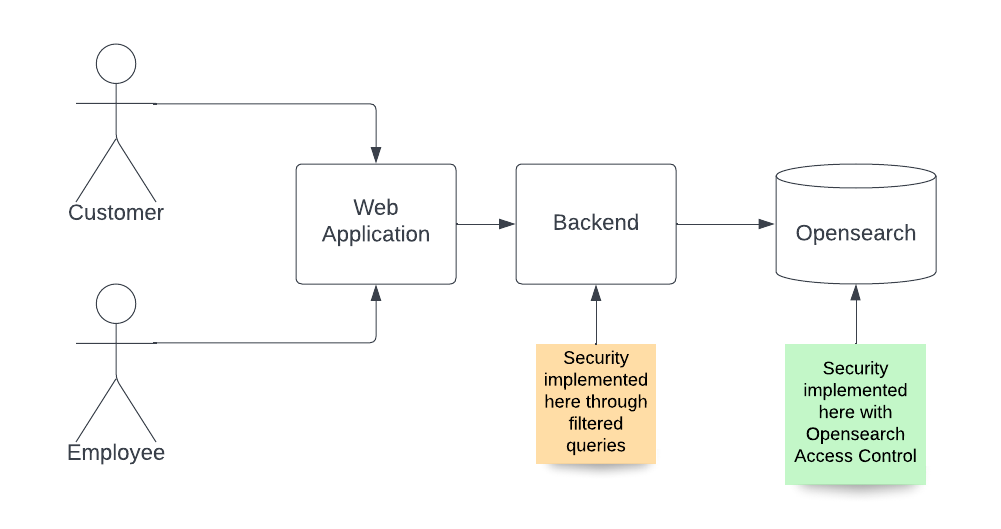
We can manipulate the access to fields/documents in the application side (i.e: backend), creating specific queries for each of the actors.
For example:
- Grumpy Pete logs in and clicks “my profile” in the application.
- The backend will know the user is gpete and will run a query to OpenSearch filtering by customer_id to only return gpete’s documents.
- OpenSearch will only return gpete documents.
The issue is that delegating security to the application creates the potential for a breach enabling any user with access to the cluster the ability to see all the content. Alternatively, an error in the query in the backend could leak sensitive data.
To avoid potential security breaches, we can secure our content using OpenSearch roles and permissions.
To demonstrate this, we will create a dashboard and see how different users see different data. Dashboards are not in the scope of this article, so we will not show how to create this one, but you can learn how to create dashboards here. The example dashboard saved object can be downloaded here.
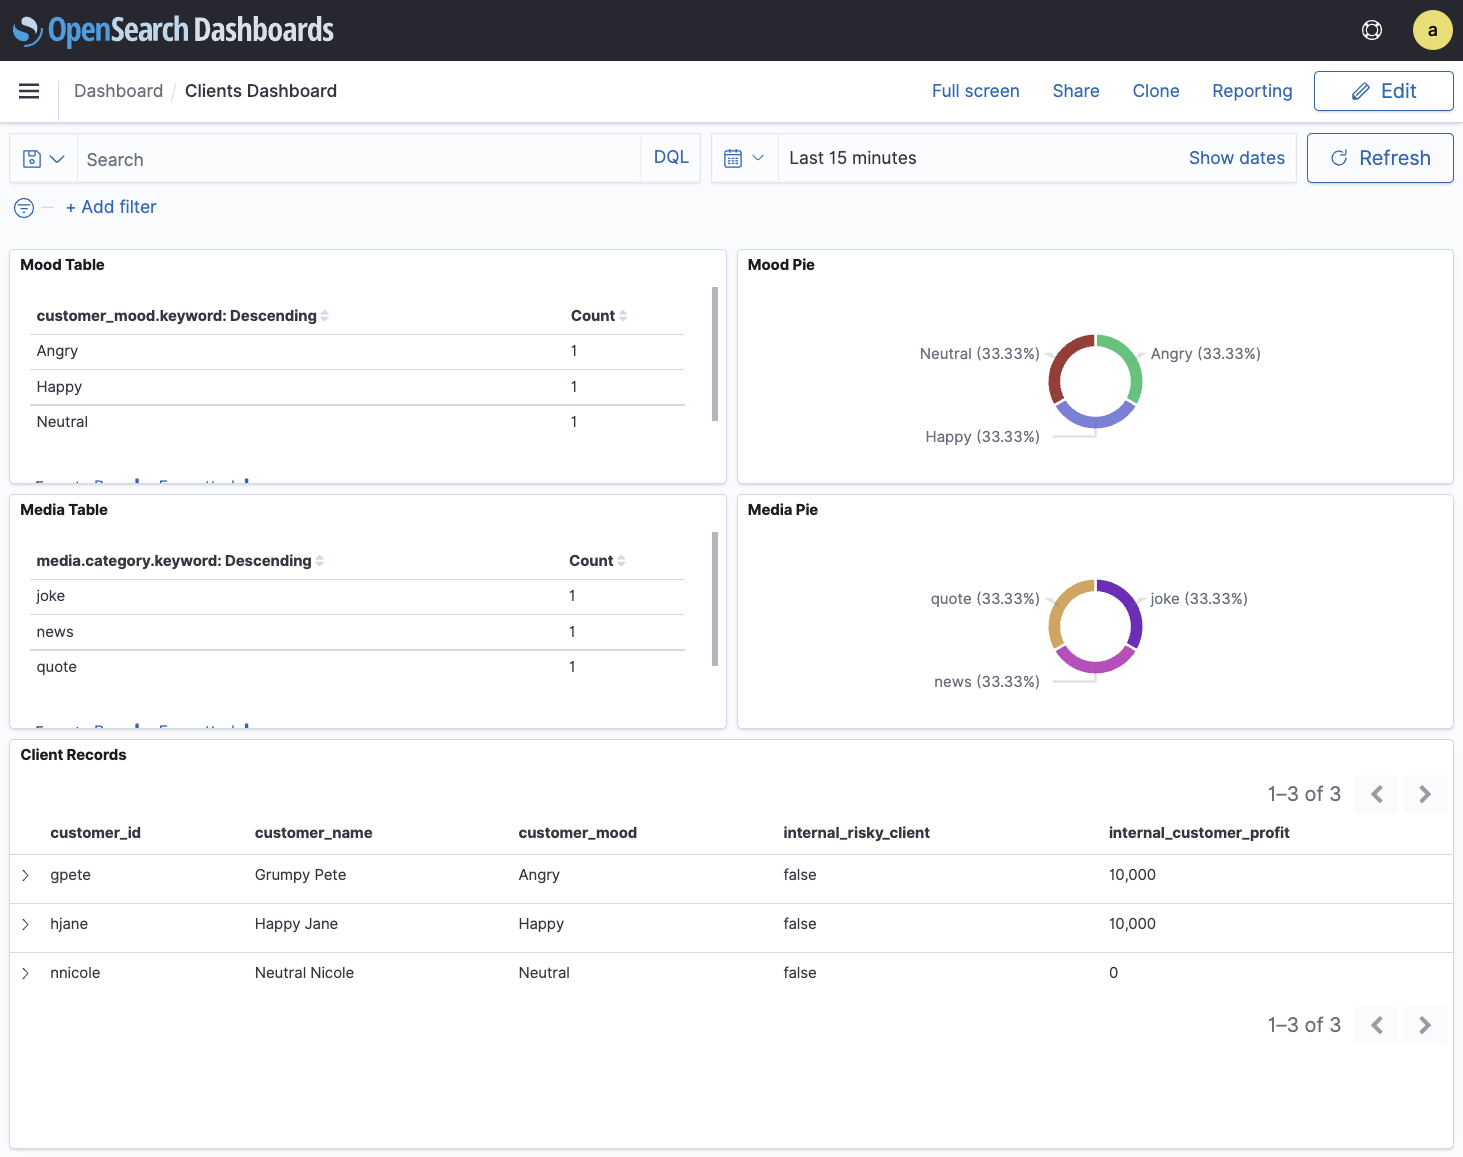
This is what a superuser will see: all users and all fields.
Now, according to the requirement, what we need to achieve is:
| Username | User Type | User Documents | Fields |
|---|---|---|---|
| manager1 | Account Manager | gpete, hjane | All |
| wellness1 | Wellness Manager | nnicole, hjane | customer_*, media.* |
| gpete | Customer | gpete | customer_*, media.* |
Before creating the users we have to model our roles and permissions. The recommendation is to use the Dashboards UI or API to create new users/roles instead of using yml files.
Roles/Permissions model
We will leverage some of the OpenSearch Security features:
- User attributes: We will create an attribute called “users”, that will define which users an employee can see. This way we don’t have to create many roles (1 per user), we can just refer to that field for document level security.
- Action groups: we will use the system action groups with the permissions we need, and reuse it across the roles.
- DLS (Document level security): To allow the role to only see certain documents.
- FLS (Field Level security): To allow the role to only see certain fields.

*Note that “manager1” doesn’t have Field level security, meaning it will be able to access all fields as required.
*Note that “gpete” does not have attributes, because we will leverage the built in user attribute.
All users and roles – configuration options
This is the big picture of all the users and roles:


Configuring manager1
manager1 – First we will create a role for all managers called manager_role: http://localhost:5601/app/security-dashboards-plugin#/roles/create
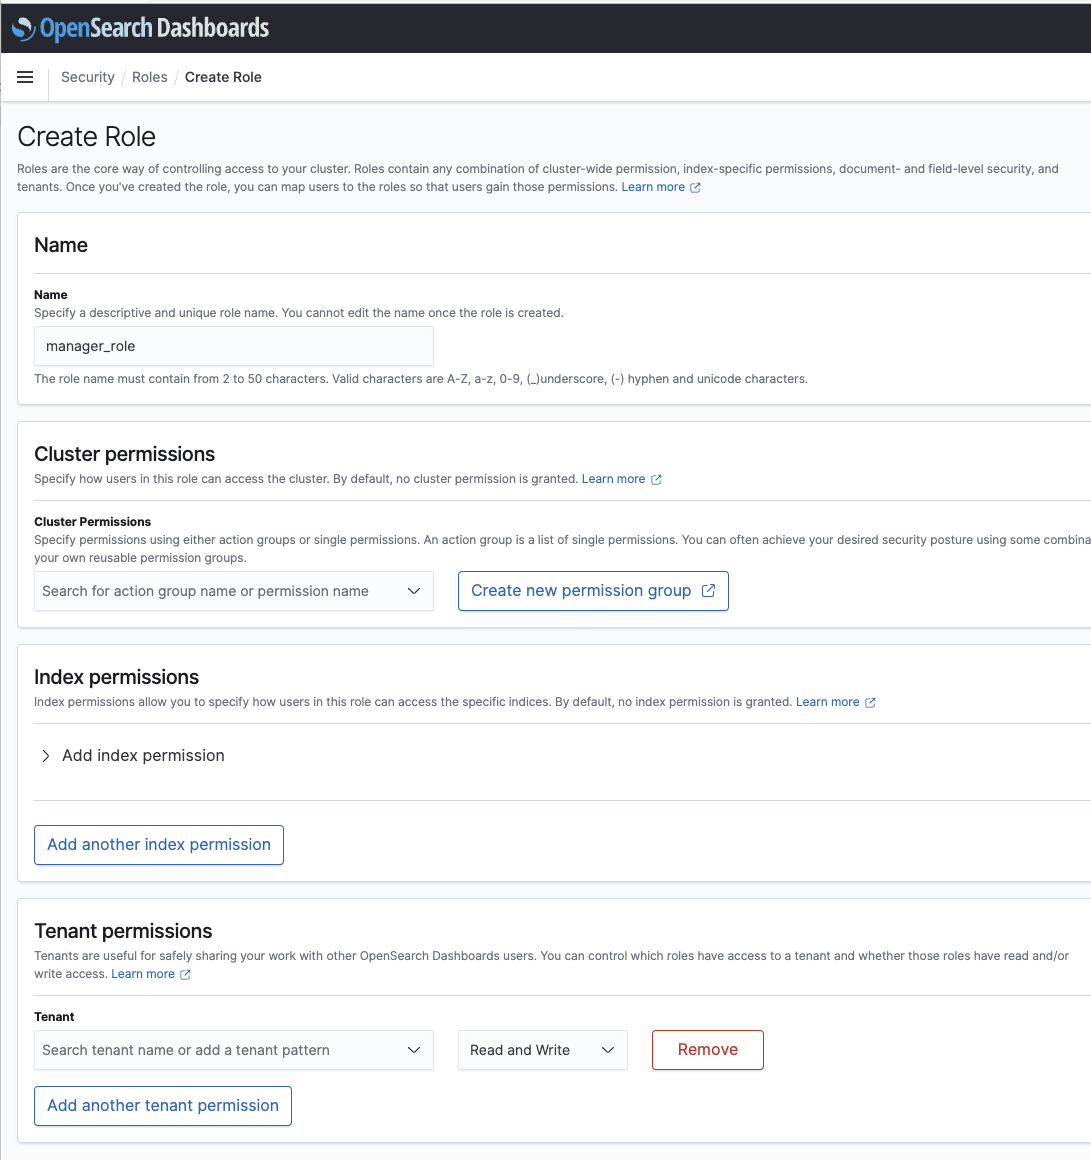
- Name – manager_role
- Cluster permissions – Remains empty, as we are not going to give this or any role privileges on the cluster in this example.
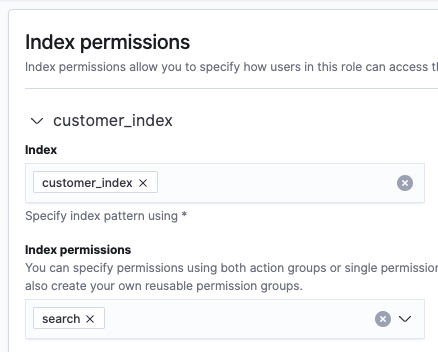
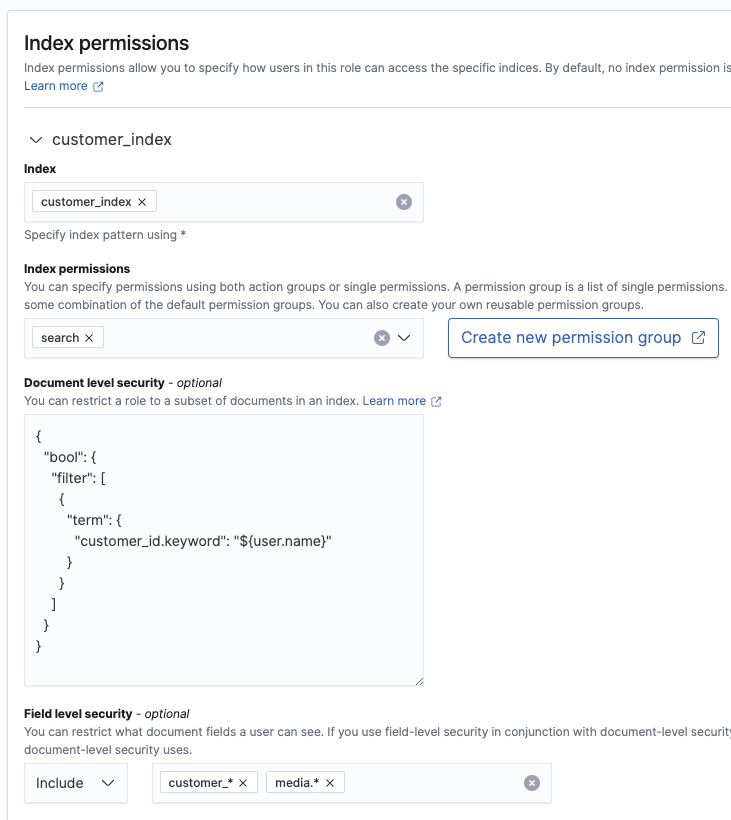
- Index – This is the index we want to give the role access to, our case is customer_index.
- Index permissions – Here we will define DLS (Document Level Security) and FLS (Field Level Security) for our manager role following the requirements. Access to all fields, but only to some users’ documents. We are taking this users list from the user attribute: “users” we are going to create later (see below).
- Index permissions (continued) – Here we can also set one/many single permissions, or one/many action groups, where each action group is a set of many single permissions.
We will use the system action group “search” that includes all the search related permissions.
Selecting “search” is the same as adding each of these permissions individually.
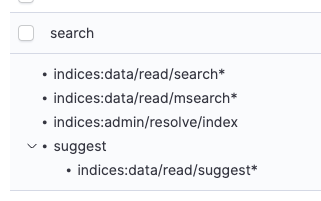
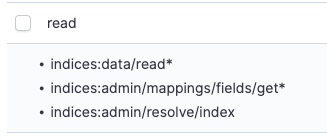
- We don’t use the “read” action group because this one is broader, giving permission to all the read operations, not only search, giving access to things like mappings or settings when we only want to allow users to execute search queries.
- You can check all the available permissions and action groups here: http://localhost:5601/app/security-dashboards-plugin#/permissions
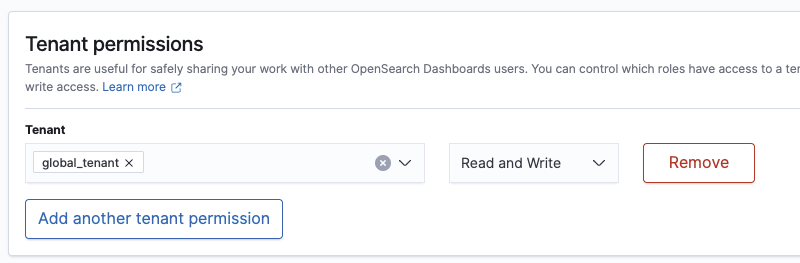
- Tenant permissions – Tenants are useful to divide OpenSearch Dashboard in different scopes. We just have to make sure to give access to this role to the same tenant where we are hosting our dashboard. For this example we will give all roles permission to read the global_tenant, and create the Dashboard there.
Document Level Security
In this section we define a query that limits which documents this role can see. We don’t have to include the query clause and instead can just put what is inside (bool in this case). Here we can set a static query, or utilize attributes.
{
  "bool": {
    "filter": [
      {
        "terms": {
          "customer_id.keyword": [${attr.internal.users}]
        }
      }
    ]
  }
}
${attr.internal.users} is the name of the attribute we will manually define on each user. The syntax is an attribute.<TYPE>.name. The types available are: internal, jwt, proxy or ldap.
The entire table with available parameters:
| Term | Replace with |
|---|---|
| ${user.name} | Username |
| ${user.roles} | A comma-separated, quoted list of user roles |
| ${attr.TYPE.NAME} | An attribute with name NAME defined for a user. TYPE is internal, jwt, proxy or ldap |
So you can utilize things like the username, roles, or authentication available data for your document level security.
Field Level Security
Here we define which fields you want to include or exclude. Per requirement the manager_role has access to all fields so we will keep this blank.
Anonymization
You can use this if you want the user to be aware of the existence of a field, but you don’t want to expose its value. For our example, we will keep it empty.
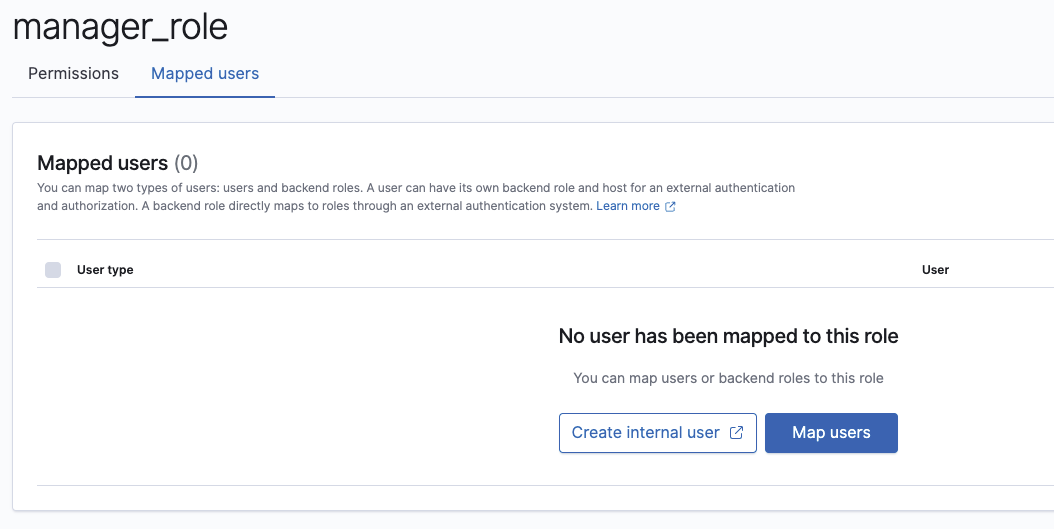
Mapping internal users
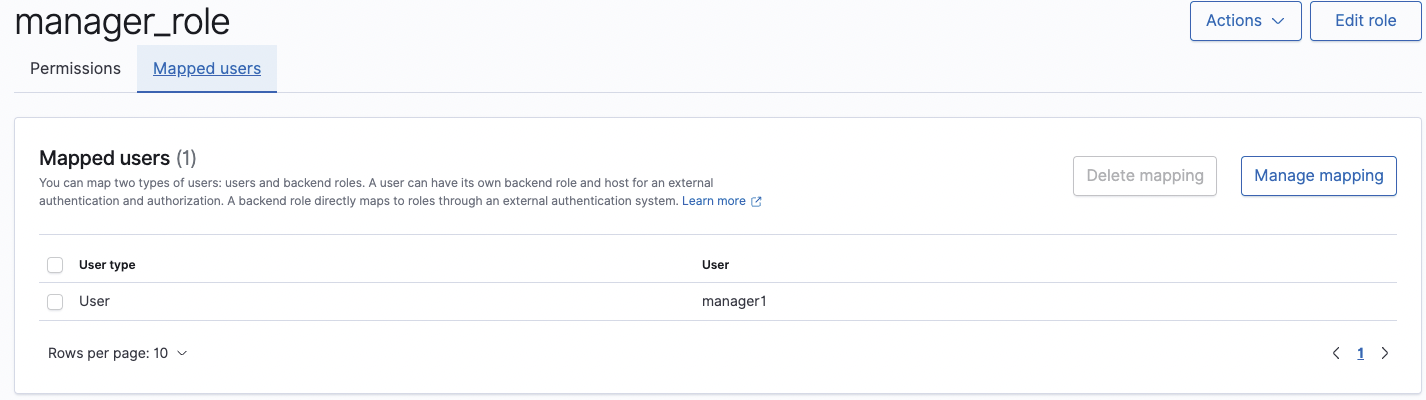
Once we created the role, we can go ahead and switch to the “Mapped Users” tab. Let’s create our manager1 user with the “create internal user” option, or directly through Security -> Internal Users -> Create internal user. After the user is created we can go to Map Users and add it.
Should look like this after mapping:
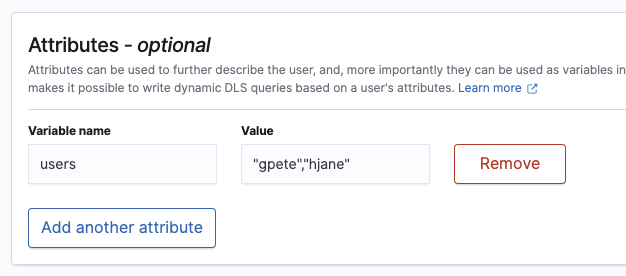
Attributes
The most relevant setting when creating this user is the Attributes field, where we set which users we want manager1 to be able to see.
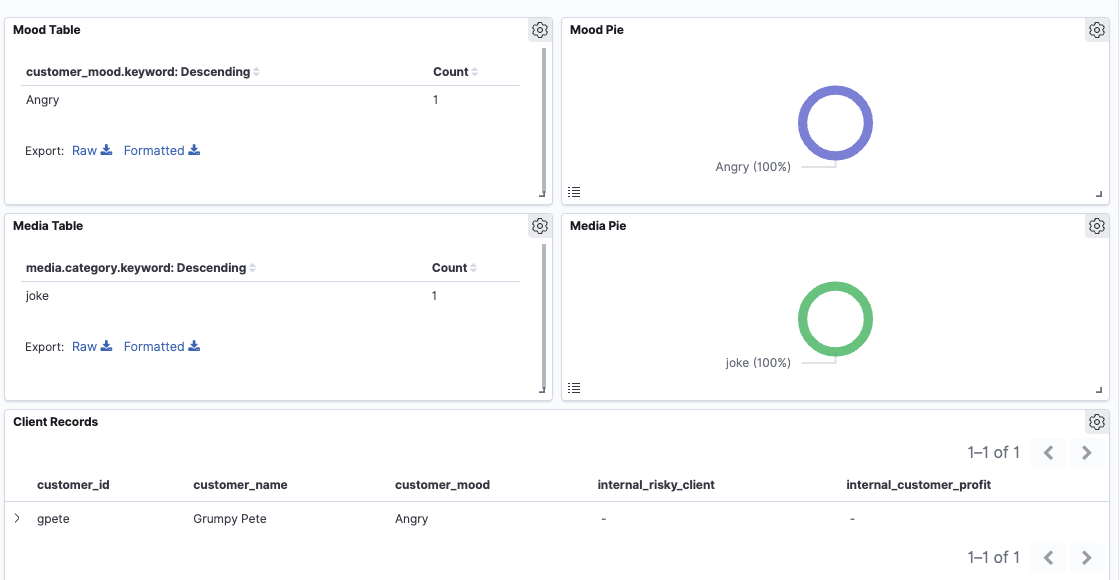
Now manager1 is set. Lets log in with its account and open the Dashboard we created:

Perfect. We see all fields of Grumpy Pete and Happy Jane. You can go to DevTools and run some queries against the index to prove you can only run search queries. For example, running the following will throw an error because this user is only allowed to execute _search queries:
GET customer_index
The error it will throw:
{
  "error" : {
    "root_cause" : [
      {
        "type" : "security_exception",
        "reason" : "no permissions for [indices:admin/mappings/get] and User [name=manager1, backend_roles=[], requestedTenant=global_tenant]"
      }
    ],
    "type" : "security_exception",
    "reason" : "no permissions for [indices:admin/mappings/get] and User [name=manager1, backend_roles=[], requestedTenant=global_tenant]"
  },
  "status" : 403
}
Let’s try:
GET customer_index / _search

{
    "took": 1064,
    "timed_out": false,
    "_shards": {
        "total": 1,
        "successful": 1,
        "skipped": 0,
        "failed": 0
    },
    "hits": {
        "total": {
            "value": 2,
            "relation": "eq"
        },
        "max_score": 2.0,
        "hits": [{
                "_index": "customer_index",
                "_id": "nEgToIABAAYXSlojhsua",
                "_score": 2.0,
                "_source": {
                    "customer_id": "hjane",
                    "customer_name": "Happy Jane",
                    "customer_mood": "Happy",
                    "media": [{
                        "@timestamp": "",
                        "category": "news",
                        "content": "Before There Were Birds or Bees, This Is How Trilobites Made Babies..."
                    }],
                    "internal_customer_profit": 10000,
                    "internal_risky_client": false
                }
            },
            {
                "_index": "customer_index",
                "_id": "7foiuoABkflilwOS73MT",
                "_score": 2.0,
                "_source": {
                    "customer_id": "gpete",
                    "customer_name": "Grumpy Pete",
                    "customer_mood": "Angry",
                    "media": [{
                        "@timestamp": "",
                        "category": "joke",
                        "content": " I almost forgot what a boomerang was, I’m glad it came back to me!"
                    }],
                    "internal_customer_profit": 10000,
                    "internal_risky_client": true
                }
            }
        ]
    }
}
Effectively we can see all fields of the 2 users we configured.
Next we’ll configure the “wellness1” user.
Configuring wellness1
The main difference between wellness1 user and manager1 user, is that wellness1 user has both document level security and field level security.
Role
Configuration here is the same as manager_role, but we have to add the allowed fields to the “Include” option under Field Level Security.

User
Just as manager1, we have to make sure we add the required customer_ids to the users attribute:
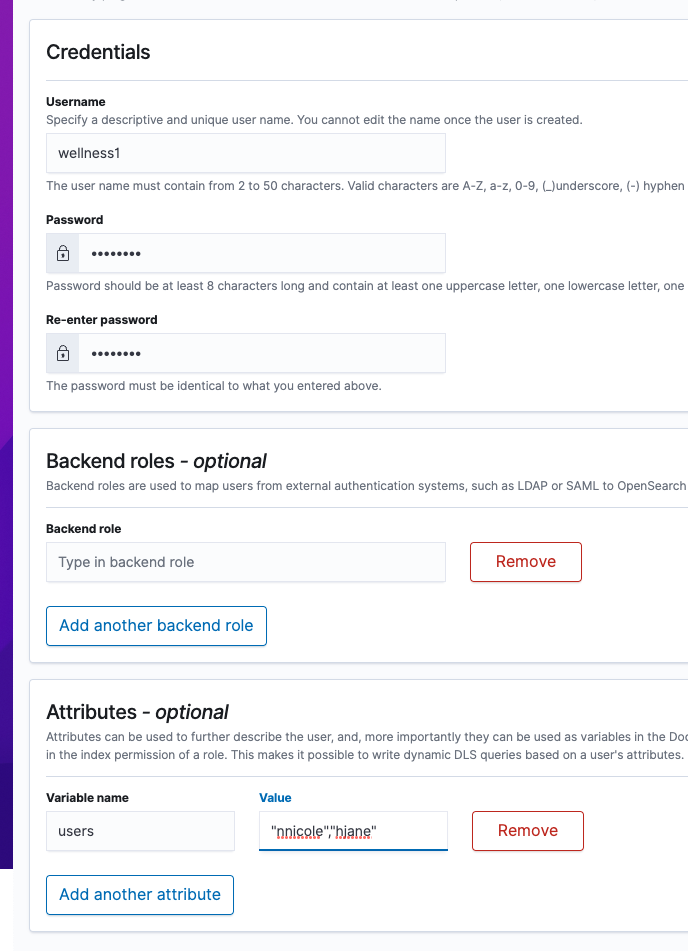
Remember to also make sure your user is mapped to the role before continuing:
Now let’s login as wellness1 and see if everything is working as expected:
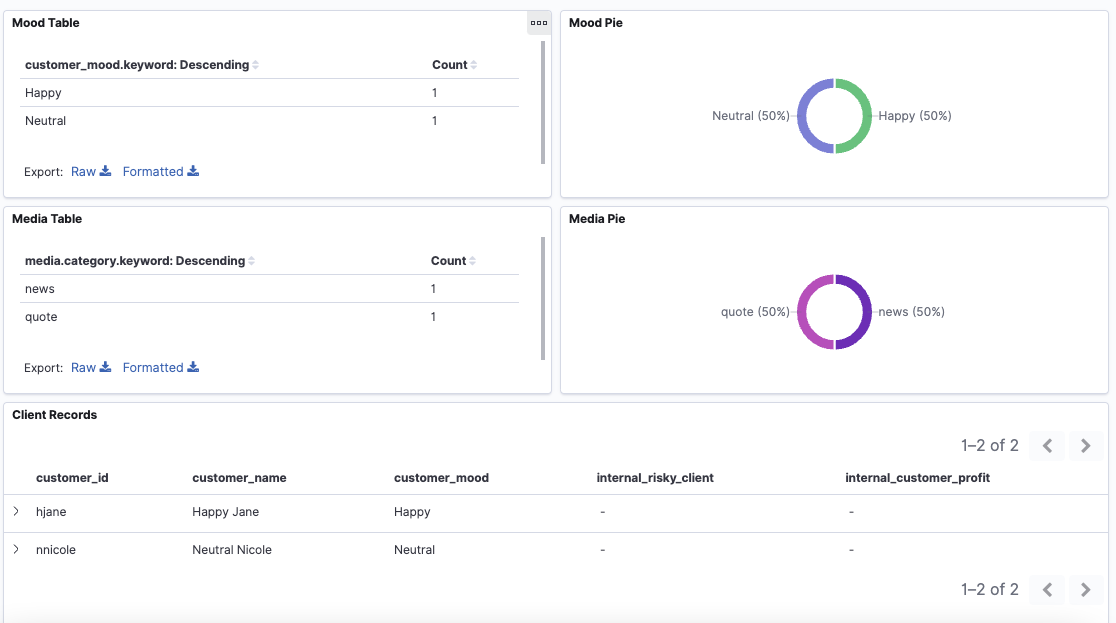
We can see the correct users and correct fields. Unfortunately we can see the field names, because the dashboard is not aware of each user’s permissions – this is just the OpenSearch query returning no value on that field. This can be solved using different Tenants for each role, and adding different fields to each dashboard.
From a security perspective it is VERY important to understand that hiding from Dashboards is not the same as securing the data.
If we have one index used by many Dashboards grouped on different tenants (let’s say the same dashboard showing different fields depending on the tenant) and we dont configure document/field level security, any user can run OpenSearch queries against all the document fields. Exposing limited fields in a dashboard is not a protection method. You need to also protect the fields at a role level as we just did.
Configuring customer_role
Now we have to configure the customer_role which can only see its own documents, and a limited set of fields. We are going to leverage the username property for this one, this way instead of configuring the “user” attribute for each new user, we can just rely on the username to filter the documents.
Hint: Can we do something similar with the manager/wellness account to avoid manually writing usernames as attributes? Yes. Using an external authentication provider we can map external groups to OpenSearch roles!
Role
The user role will look very similar to the wellness_role. The difference will be in the document level security query. Instead of setting an array of customer ids, we are defining a single ID obtained from the username:
Also, remember to add the global_tenant to see the dashboard:

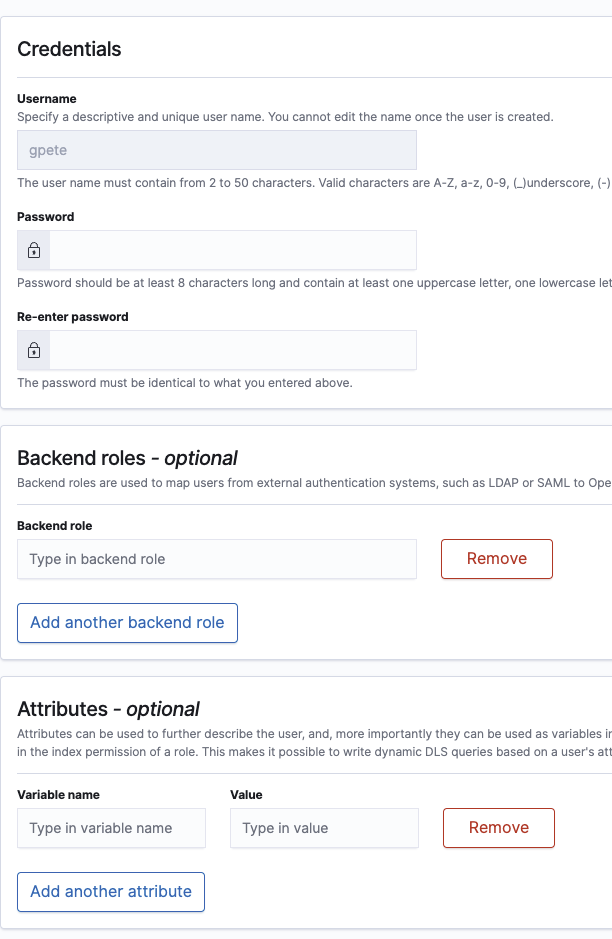
User
For the User creation you just have to make sure the username you are setting is the same as customer_id value. You don’t have to set any extra attribute because OpenSearch will take the username automatically.
We created the gpete user. As you can see, no extra configurations, just the username and password.
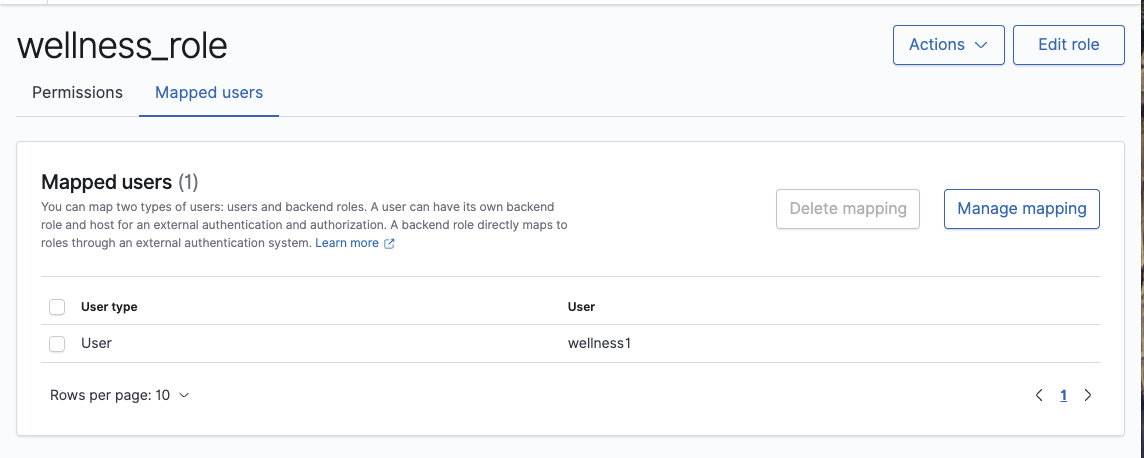
The next step is to assign the customer_role from Mapped users -> Manage mapping option.

Let’s login with gpete credentials and open the dashboard. First, select Global as tenant option:
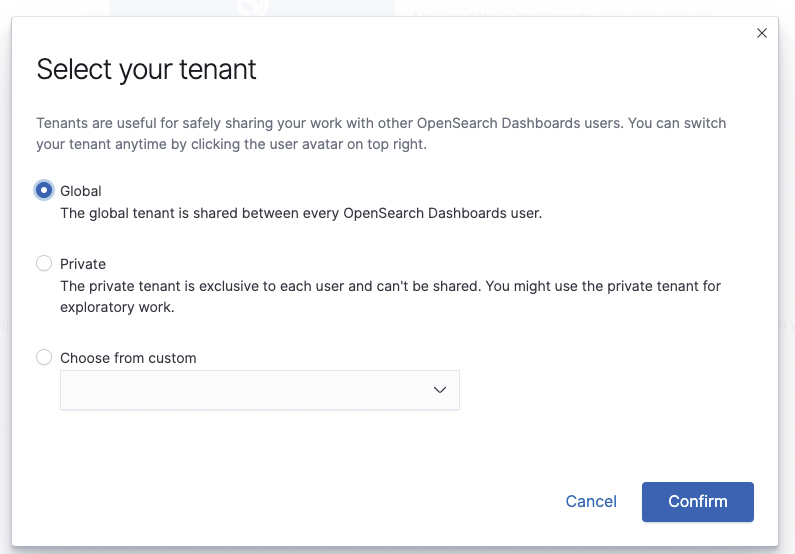
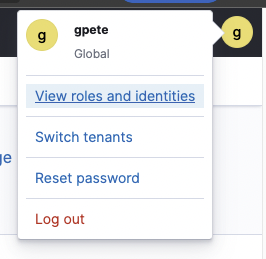
This option can be changed afterwards from the top right “Switch tenants” option:
The next step is to assign the customer_role from Mapped users -> Manage mapping option. Don’t forget to click “Map” when you finish.
Summary
Sometimes we need different users to access different documents or fields within the same index, and access control becomes a concern. You could create different indices for each of the user roles, but that can be hard to maintain and data redundant. You could also put the cluster behind a backend, and let the backend create the queries/filter documents/hide fields, but this solution is prone to errors and data leaking.
By setting up access control in the cluster, you can ensure that each user will be able to access what they need to in order to complete their tasks, without being exposed to data they shouldn’t be.
Configuring access control for our indices requires minimal effort, using a convenient UI. You can also use an external authentication provider and map that provider groups to OpenSearch roles, making the process of migrating user permissions frictionless.
You don’t have to create/maintain the same list of users you have in your current IDP in OpenSearch. You just administrate your users as usual and OpenSearch does the rest.